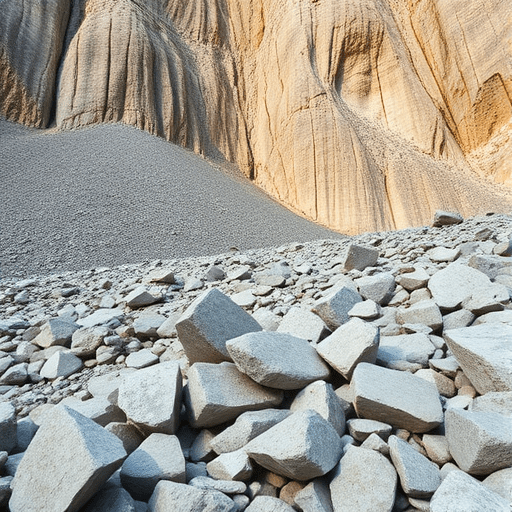
Before you lace up and head into the high country, learning to read the mountain before you hike is the single most underrated skill in backcountry safety. Every ridge, slope, and shattered boulder field carries evidence of past falls—and potential future ones—if you know where to look. Rockfall doesn’t happen at random. It obeys the physics of slope angles, the tug of freeze-thaw cycles, and the slow creak of a mountain trying to settle into a lower shape. This isn’t about becoming a professional geologist; it’s about training your eye to recognize the difference between a stable path and a tilted apron of loose stone waiting for the wrong footfall.
The Mountain’s Telltale Arithmetic: Angle of Repose and Talus Cones
Every pile of rocks on a mountainside is a self-portrait of failure. When a cliff sheds blocks, the debris lands in a cone or fan shape below. The steepness of that pile is not arbitrary—it’s capped by something geologists call the angle of repose. For dry, angular rock, that angle typically hovers around 30 to 35 degrees. Try to make the slope steeper by adding more rock, and gravity wins, triggering a small cascade. This means that if you’re looking at a talus cone and its slope looks like a staircase someone left mid-collapse—too steep to walk upright without using your hands—it’s likely still adjusting.
Fresh vs. Old Talus: Reading the Clock of a Rockpile
Not all talus is equal. A fresh rockfall deposit has sharp, angular blocks with no lichen or moss, and it sits in a loose, chaotic arrangement with lots of gaps between stones. An old, stable talus slope has rounded edges, lichen crusts, and fines—sand and dirt—that have filtered into the gaps, effectively welding the surface into place. Before you cross a boulder field, ask yourself: does this pile look like it was assembled yesterday or a thousand years ago? If the rocks are so clean that they look like they were just split by a hammer, treat that slope as a hazard zone.
- Check for lichen: Gray, orange, or black patches indicate long-term stability.
- Look for interlocking: Rocks that appear settled into a matrix of dirt and pebbles are less likely to shift.
- Listen for hollow sounds: Tapping a rock with your trekking pole gives a dull ring if it’s solidly seated, and a hollow rattle if it’s floating free.
Scree Fields: The Language of Loose Stone
Scree—those endless slopes of small, fist-to-head-sized stones—can be deceptively risky. Unlike talus, which sits at the foot of cliffs, scree often accumulates on moderate slopes and behaves more like a fluid. You’ve likely seen those long, polished gullies where every step sends a shower of stones downhill. That’s not just an inconvenience; it’s a message that the slope is at or near its failure threshold.
How to Tell Active Scree from Cemented Scree
Active scree is the loose, moving kind. It usually forms on slopes of 25 to 35 degrees, where stones are constantly being nudged by your boots, by animal hooves, or by the afternoon sun melting the ice that held them in the morning. Cemented scree, by contrast, is a layer of small rocks mixed with fine sediment that has dried into a crust. It feels almost like walking on decomposed granite. You can kick at it and nothing budges. When you’re scanning a route, look for the telltale stripes of a scree run: lighter bands where fresh rock has been exposed by sliding stones. That’s the mountain showing you its active conveyor belt.
Water and Ice: The Hidden Architects of Unstable Slopes
Rain, snowmelt, and frost are the three engineers of rockfall. A slope that was perfectly stable in the morning can turn treacherous by midday, not because the rocks themselves change, but because the water pressure between them does. When thawing ice melts, it lubricates the thin clay layers beneath boulders, allowing them to shift with surprising ease. You can read this signal in the landscape: watch for damp seams, seeps, or dark staining on rocks that suggests water has been flowing through cracks.
Pay special attention to the base of cliffs and steep gullies after a heavy rain or freeze-thaw cycle. The mountain is literally soaking up water, expanding and contracting, cracking already weakened joints. In the alpine zone, look for fresh scars on rock faces—lighter-colored patches where a block has recently pulled away. If you see such scars, look downslope to see where the debris landed. That trajectory is the same one a future rock will take, and you know exactly where you should not stand.
The Rock Record: What Your Feet (and Hands) Can Tell You
Geology basics also involve literal touch. You can learn a lot about a rock by pressing on it. A block that shifts, wobbles, or sinks under your hand is not load-bearing. A block that feels like part of the earth—no give, no hollow pocket beneath—is your friend. When crossing steep scree, test each hold as if you were climbing. Let your weight transfer slowly, and if you feel a stone start to roll, say so loudly and clearly to anyone below you. This is not about overthinking; it’s about developing a tactile dialogue with the mountain.
If you’re using trekking poles, use them as probes. Poke the ground two steps ahead of you. A solid surface will produce a dull, firm impact; a hollow spot will sound like knocking on a door. Many hikers avoid poles on scree because they can puncture the surface and trigger small slides, but using them lightly can actually save you from stepping onto a trap.
The Changing Climate: Why Old Routes Are Becoming New Hazards
In recent years, mountain travelers have noticed something unsettling: rockfall is starting to appear in zones that old trail guides described as “safe.” This isn’t a coincidence. Warming temperatures are thawing permafrost at high altitudes, and once-frozen rock towers are beginning to shed their outer shells. Meltwater is penetrating deeper into cracks, and more frequent freeze-thaw cycles are doing the work of a slow, relentless hammer.
The practical implication is this: historical knowledge is useful, but it is not a guarantee. A path that was stable in 2010 may have developed a new overhang, or a scree field that used to be compacted may now be reset by a large rockfall that loosened the entire slope. Before you head out, check recent trip reports and satellite images. When you’re on the ground, treat any slope with fresh debris, fresh scars, or a crease of wet soil as a place where the old rules no longer apply.
A Field Checklist for Safer Traverses
Reading the mountain before you hike is a skill you can apply anywhere, whether you’re on an alpine scramble or a canyon rim. Use this quick checklist to keep your eye sharp:
- Scan for fresh scars: Lighter-colored rock faces and clean fracture lines indicate recent rockfall.
- Assess the talus angle: If the slope feels steeper than a steep staircase, expect it to move.
- Look for lichen and moss: They are the mountain’s green signal that rocks have stayed put for decades.
- Identify wet lines: Moisture streaks and seeping water often mark weak zones.
- Choose the ridgeline over the base: Walking along the crest of a talus fan is usually safer than walking at the bottom, where falling rocks gather.
- Travel one at a time: On exposed scree, keep at least 10 to 15 meters between each person to avoid chain reactions.
- Wear a helmet: It may feel heavy, but it’s the ultimate insurance against the one rock that matters.
Geology is not a dusty textbook subject; it is a live, breathing system that writes its warnings in the shape of the land. By learning to read the mountain before you hike, you trade blind luck for informed awareness. You’ll notice the too-new boulder, the over-steepened pile of scree, the wet seam that glistens in the afternoon sun. And you’ll make better decisions—step here, not there; cross this ridge, not that gully—because the mountain has already told you what it plans to do next.