If you’re planning a long‑distance European road trip and want to keep your devices charged without lugging a heavy power bank, a DIY portable solar charger is the solution. This guide walks you through selecting the right components, wiring them safely, and mounting the system for maximum sun exposure on the road. By the end, you’ll have a lightweight, high‑efficiency charger that fits comfortably in your backpack and stays ready for the next adventure.
Choosing the Right Solar Panel
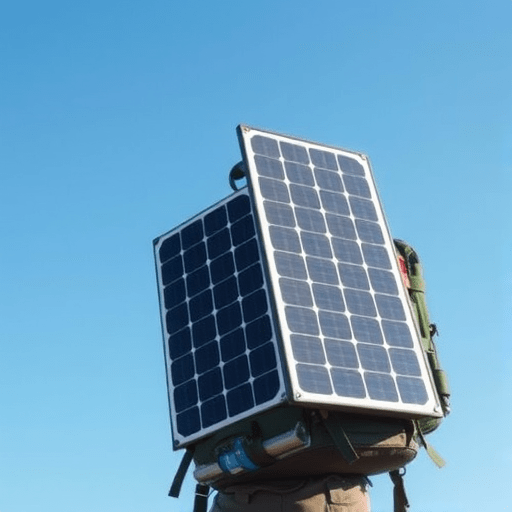
Panel selection is the cornerstone of any portable solar system. For backpackers, the trade‑off is between power output, weight, and durability.
- Output power: Aim for 20–30 W. That’s enough to keep a smartphone, tablet, and a small camera charged while still light enough to carry.
- Thin‑film vs. crystalline: Thin‑film panels are lighter (≈0.4 kg for a 20 W panel) and more flexible, but they’re less efficient (~12–14%). Crystalline panels (≈0.6 kg) offer 15–18% efficiency but are sturdier.
- Weather resistance: Look for a robust frame, a sealed glass layer, and an IP65 rating to survive rain, dust, and occasional knocks.
- Connector compatibility: Choose panels with a standard MC4 connector to simplify wiring.
For a 20 W panel, the weight will be roughly 0.4–0.6 kg, making it an ideal fit for a backpack that already contains a lightweight tent and cooking gear.
Selecting Efficient Batteries
The battery stores solar energy for use when the sun is obscured. Lithium‑ion technology provides the best energy density for portable setups.
- Capacity: A 20 Ah, 3.7 V Li‑ion pack (~74 Wh) can recharge a phone (~10 Wh) four times and a tablet (~15 Wh) twice.
- Protection circuit: Include an PCM to guard against over‑charge, over‑discharge, and short‑circuit.
- Form factor: Opt for a flat pouch pack or cylindrical cells in a 18650 pack. The pouch is lighter and more flexible for back‑pack mounting.
- Thermal management: Place the battery away from direct solar panels to prevent overheating. A small thermal sleeve or heat‑resistant tape can mitigate heat transfer.
When choosing a battery, factor in the overall weight budget. A 20 Ah pack typically weighs about 0.4 kg, which is manageable within a 2 kg battery compartment.
Integrating USB‑C Power Delivery
USB‑C with Power Delivery (PD) is the standard for fast charging modern devices. Converting the 3.7 V battery voltage to a 5/9/12 V USB‑C output requires a reliable DC‑DC converter.
- Step‑up converter: Choose a converter with a maximum output of 20 W and 3.3 A. The boost module should support 5 V, 9 V, 15 V, and 20 V PD profiles.
- Efficiency: Look for >90% efficiency to minimize heat and preserve battery life.
- Built‑in USB‑C port: Some converters come with an integrated USB‑C port and an LED indicator that shows active charging.
Wire the converter to the battery via a short, shielded cable to reduce voltage drop. The converter’s input side connects to the battery’s 3.7 V output; the output side plugs into a standard USB‑C cable.
Building the Charge Controller
A charge controller balances the power input from the panel, regulates battery charging, and protects the system. For a DIY project, the ESP‑32 based BMS boards are popular because they combine microcontroller and charge regulation.
- Solar input stage: Connect the panel to a MPPT (Maximum Power Point Tracking) module. Even a simple PWM controller can significantly improve efficiency compared to a basic linear regulator.
- Battery management: The controller must monitor cell voltage, temperature, and current. A 4‑cell BMS is typical for a 14.8 V system (4×3.7 V).
- USB‑C PD interface: Route the PD output through the controller’s output port, ensuring the converter is only active when the battery is fully charged or the panel output exceeds 5 V.
All connections should be soldered with proper heat‑sinked, insulated joints. Use heat‑shrink tubing or soldering blankets to prevent short circuits during the hot summer days on the road.
Mounting and Protection for Road Trips
A sturdy mounting system keeps the charger stable and protects it from the elements.
- Mount base: Fabricate a small aluminum plate that attaches to your backpack’s frame or a dedicated bag. The plate should allow the panel to face upward toward the sun.
- Flexible strap system: Wrap the panel with a Velcro strap and a protective silicone sleeve. This allows you to roll the panel down when not in use and reduces vibration damage.
- Cable management: Tuck all cables into a zippered compartment. Use braided sleeving for the battery cables to withstand twisting and bending.
- Rain cover: Add a clear, waterproof cover that slides over the panel. It keeps rain off while still letting light through, and it adds a layer of protection against accidental knocks.
When traveling through mountainous regions, orient the panel to face the sun’s lower angle. A small tilt adjustable mount can be built with a lightweight aluminum rod and a 3‑point pivot.
Testing and Troubleshooting
Before hitting the road, perform a full test cycle to confirm the charger operates as expected.
- Initial charge: Place the panel in direct sunlight and verify the voltage rises to the expected peak (≈18 V for a 20 W panel).
- Battery SOC check: Use a multimeter to read the battery’s voltage. A fully charged 14.8 V pack should be between 14.8 and 15.2 V.
- USB‑C output test: Connect a smartphone and monitor the charging indicator. If the phone doesn’t charge, check the PD converter’s LED status and the converter input.
- Thermal test: Run the system for 2 hours and feel for excessive heat on the battery or the converter. If it’s hot to touch, add a heat sink or increase ventilation.
Common pitfalls include loose solder joints that fail under vibration, incorrect MPPT settings that undercharge the battery, or over‑current limiting that throttles the USB‑C output. Addressing these early will save headaches on the road.
Sustainable Travel Tips for Solar Users
- Plan charging windows: Schedule charging sessions during the day when you’ll be parked, rather than attempting to charge during night‑time stops.
- Optimize panel orientation: Use a small handheld inclinometer to keep the panel angled for maximum sun exposure.
- Minimize consumption: Turn off Wi‑Fi and background data on devices when not needed; use airplane mode to extend battery life.
- Use a dedicated charger: Keep the solar charger separate from your primary power bank to avoid accidental power drain.
- Recycle responsibly: When the battery’s capacity degrades below 70%, donate it to a local electronics recycling program or swap it for a fresh pack.
By following these practices, you reduce your environmental footprint while enjoying reliable power throughout your European journey.
In conclusion, a DIY portable solar charger tailored for backpacking on a European road trip combines thoughtful component selection, solid engineering, and practical mounting solutions. With a 20 W panel, a 20 Ah Li‑ion pack, a high‑efficiency USB‑C converter, and a reliable charge controller, you’ll have a lightweight, efficient power system that keeps your devices alive no matter how far the road takes you.