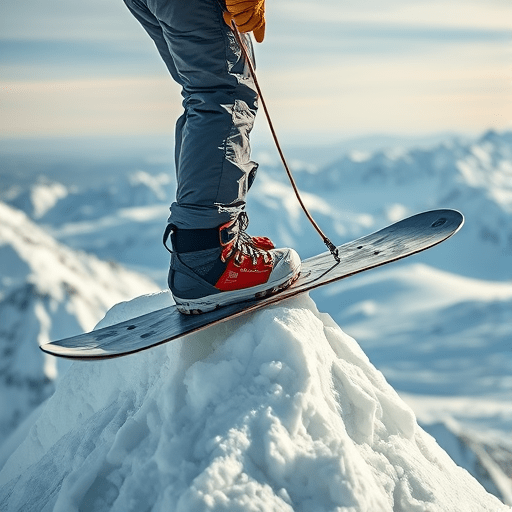
Steep slope snowboard strapping is the most exposed moment of an otherwise controlled backcountry descent, and it becomes truly uncomfortable when the only available platform is a hard, wind-scoured ridge. The leash trick for icy ridges is a simple but effective answer: leash your board to a boot to keep it stable while strapping in. It is not a stomp-pad substitute and it is not an excuse to skip good route judgment. It is a mechanical solution to a terrain problem — a short tether that keeps your board from sailing down the fall line while you are trying to get in and go.
Why the Standard One-Foot Stop Fails on Hard Snow
Most riders learn to stop with the front foot strapped in, place the rear foot on the stomp pad, and reach down to fasten the rear binding. That works on a groomed run or a soft spring slope. On an icy ridge, the board has no purchase. The snow surface is often bulletproof, the stomp pad has little bite against a cold boot sole, and any slight change in balance makes the whole setup drift downhill.
The problem is friction. Stomp pads and textured binding trays assume that the boot will stay in contact with something rough. On ice, neither the board nor the boot produces enough friction to anchor the system. Your body becomes the only brake. Strapping in quickly while balancing on one foot makes the movement worse, because the act of bending down shifts your center of mass and loads the downhill edge of the board. The trick is to replace a reliance on friction with a positive connection.
What Is the Leash Trick for Icy Ridges?
The leash trick turns one of your boots into an anchor point. Instead of relying on the board to stay where you put it, you create a physical link between the board and the leg that is not yet locked into the binding. When the board starts to move, it cannot move farther than the leash allows. That gives you a moment of pull instead of a moment of panic.
This is not a new concept in snowboarding, but it has become more relevant with the current generation of lightweight backcountry boards and tech-style boot packages. A standard board leash used to be a lift-maze accessory; now it can act as a portable anchorage system for steep slope snowboard strapping. The key is to place the leash between the board’s binding attachment point and the cuff of the boot that is free.
Once that tether is in place, the board becomes an extension of your leg. If it slides, your leg feels the tension immediately. You can pull the board back toward your body, brace with your free leg, and continue strapping in. The board may slide a few centimeters, but it will not disappear over the ridge.
Step-by-Step: Leash Your Board to a Boot for Stable Strapping
There are several ways to execute this move, depending on whether you are switching from one-foot riding, hiking with the board on a pack, or walking along a ridge with the board in your hand. The basic principle is the same. Here is a reliable sequence for a hard icy ridge.
1. Keep a Short Leash Accessible
Use a lightweight leash or locking carabiner system that can be attached quickly with one hand. Avoid a long bungee rope. A long leash creates slack, and slack is what lets a board accelerate before the connection matters. A short static leash, roughly the length of your lower leg, is easier to control.
2. Attach One End to the Board First
Clip the board end to the leash mount on your binding or to the center disc area if your binding has no dedicated leash loop. Many modern bindings include a small loop near the heel hoop or a slot in the baseplate. This end should be secured before you need it, ideally while you are still standing on safer terrain.
3. Connect the Other End to Your Free Boot
When you reach the icy ridge and you are ready to fully strap in, keep your front foot in its binding and keep your rear foot free. Clip the other end of the leash around the cuff or upper heel area of that free boot. It can go over the shell, not inside, so it does not interfere with your foot getting into the binding. If your leash uses a loop rather than a clip, put the loop around the boot before you place your foot on the snow.
4. Use the Leash to Pull the Board into Position
Set the board across the fall line, with the front binding already engaged. Keep your free boot on the uphill side of the board, or wherever you have the most stable footing. Pull the leash taut. The board should be held within a small radius of your boot. If the icy surface begins to move the board, you can counter with your leg instead of chasing after it.
5. Strap the Rear Binding While the Board Stays Attached
With the leash still connecting the board to your free boot, put your rear foot into the binding. The tether should sit outside the highback and outside the ankle strap so it does not interfere with the closure. Strap down normally. As you reach to adjust the straps, the board remains tethered to your leg. Once everything is secure, release the boot-side connection before dropping into your line, or route it in a way that is compatible with your binding and riding style.
Leash Features That Matter for Steep Slope Strapping
Not all leashes are equal. The one dangling from your old resort binding might be too long, too stretchy, or too awkward to release. For icy ridge work, look for these features:
- A static cord, not a bungee: Stretch stores energy and allows the board to move farther before the leash catches. Static cordage gives instant feedback.
- A positive locking connector on both ends: If the leash uses a small carabiner, choose one with a locking gate or a secure snap that will not pop open when the leash goes tight.
- A quick-release option: Once you are strapped in, you need to remove the boot side without removing your gloves. A simple hook or two-piece system is better than a knotted loop.
- Corrosion-resistant hardware: Ice, wet boot soles, and salt from snow can rust cheap snaps. Look for stainless steel or coated hardware.
If you are using an older leash with a fixed boot loop, you can make it more reliable by adding a small snap hook to the loop. That gives you a removable connection point at the boot instead of a permanent sleeve around the cuff.
Where the Leash Trick Still Has Limits
The leash trick is a practical solution for short-to-medium icy sections where you need to stop, strap in, and move again. It is not a tool for extreme terrain where a fall would be fatal, nor is it a replacement for proper anchoring with a ski pole or ice axe. It also does not make a board magically stable on a 50-degree cross-slope. What it does is prevent the most common failure: the board sliding away just as you are lifting your free foot into the binding.
There is also a safety consideration for avalanche terrain. If you are riding in open alpine terrain with overhead hazard, you should not create a tether that cannot be released quickly. A board leashed to your leg can become a drag in a slide. Use a system with a clear quick release, and keep the boot-side attachment easy to break or unclip.
For most riders, the leash trick will be most useful in spring snowboarding, when freeze-thaw cycles create shallow ice layers on ridgelines and north-facing exits. It is also valuable for splitboarders who transition back to snowboard mode near a windy col.
Build the Habit Before You Need It
Practice the leash trick on a groomed but firm morning, not on a serious line. Click one foot in, attach a short leash to the free boot, and experiment with how much tension keeps the board near your stance. Once you feel how the tether catches the board’s weight, the move becomes automatic. You will start choosing better stopping spots because strapping in no longer feels like a gamble.
Steep slope snowboard strapping will never be as casual as strapping in on the flats of a parking lot. But the leash trick changes the equation on icy ridges by giving you a simple, mechanical advantage: the board is attached to you before you are fully attached to it. In a sport where most hard-snow problems start with a sliding board, that short tether is a deceptively powerful tool for staying in control and keeping the ride moving.